China World Technology Medical Equipment Service Group
Win-win together!
 |
| Brand Name: | ITG |
| Model Number: | M-04 |
| Minimum Order Quantity: | 1 |
|---|---|
| Packaging Details: | ► Turn the wheel to highlight the number of records to print. The choices are: |
| Delivery Time: | 3-5 working days |
| Payment Terms: | T/T, Western Union,PayPal |
| Product Name: | ITG | Type: | M-04 |
|---|---|---|---|
| Application: | Medical Equipment,ICU,hospital Device | Warranty: | 90days |
| Paper Width: | 58mm | Measurement Range:: | 0 To 100 Vol.% |
| Expected Operating Life:: | ~ 1,000,000 Vol.% H | Electrical Connector:: | 3-pin Molex Gold Plated |
| Initial Output Signal:: | 13.0 To 16.5 MV @ Dry Ambient Air | Response Time T90:: | < 12 S |
| Operating Temperature:: | 10 To 40 °C | Pressure Range:: | 700 To 1250 HPa |
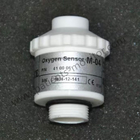
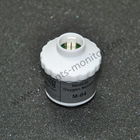
| High Light: | ITG M-04 Medical Oxygen Sensor,Ventilator Machine Medical Oxygen Sensor |
||
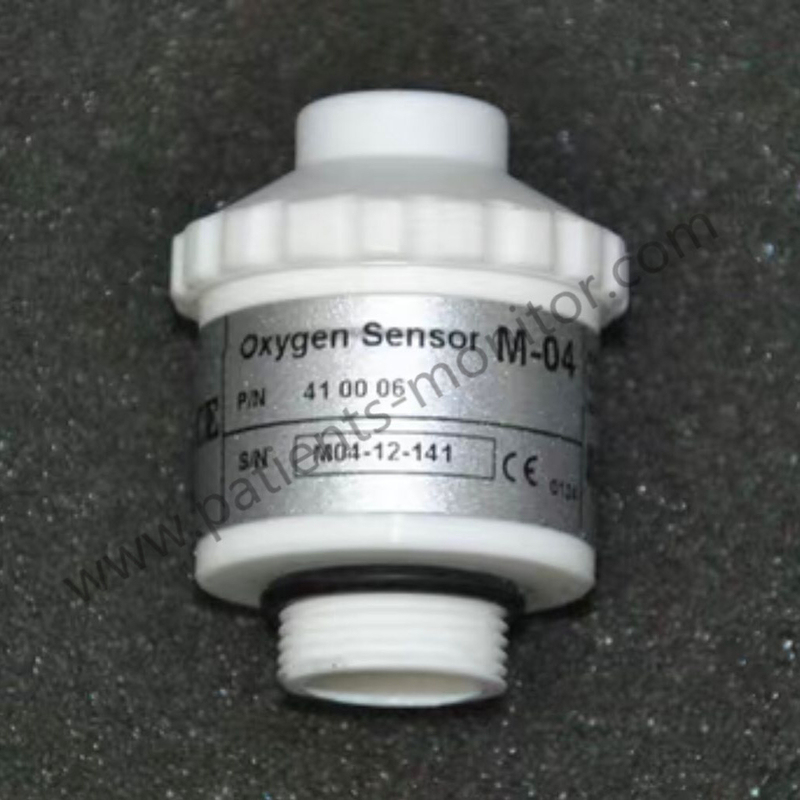
ITG M-04 Oxygen Sensor Medical Sensor for Puritan Bennett™ 840 Ventilator machine
► Oxygen sensor replacement with access port
1.Locate the flexible oxygen sensor access cover on the top right edge of the BDU housing.
2.Firmly push the center of the lower flap of the access cover until the lower flap is dislodged from the housing.
![]()
3.Pinch the bottom and top flaps of the access cover firmly together and pull the access cover away from the housing to remove.
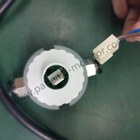
4. Press wire retainer tab away from the connector to release the sensor cable connector. And gently remove the connector from the oxygen sensor.
![]()
5.Remove the oxygen sensor from check valve housing.
6.Slide the new O-ring onto the threaded end of the replacement oxygen sensor. Seat the O-ring snugly against the sensor base above the threads.
7.Insert the threaded end of the oxygen sensor into the cavity on the check valve housing and finger-tighten the sensor without using excessive force. As the sensor is installed, ensure that it is not cross-threaded.
8.Connect the sensor harness connector to the oxygen sensor with the ridge on the cable connector oriented towards the wire retainer tab on the oxygen sensor.
9.Replace the access port cover by first sliding its top flap into the opening on the top of the BDU housing.
10.Using both thumbs, seat the port cover in the port by press the two outside corners of the lower flap at the juncture of the housing edge, fitting the into the housing opening.
11.Continue using both thumbs and firmly press the lower flap into place, working around the flap from the outside corners to the bottom center to seal the access cover. Be sure that the cover properly seals the housing opening.
12.Calibrate oxygen sensor by pressing 100% O2/CAL 2 min key. Verify that the calibration passes.
13.Run an SST to check the system before placing the ventilator in service.
► Oxygen sensor calibration test
Test the oxygen sensor calibration as follows:
1. Connect the ventilator’s oxygen hose to a known 100% O2 source (for example, a medical-grade oxygen cylinder). Press the 100% O2/CAL 2 min key or the INCREASE O2 2 min key to calibrate the oxygen sensor. Proceed to the next step once the key light turns off.
2. Connect the ventilator oxygen hose to another known 100% O2 source (for example, a second medical-grade oxygen cylinder).
3. Set O2% to each of the following values, and allow one minute after each for the monitored value to stabilize:
21%
40%
90%
4. Watch the upper screen to ensure the value for O2 (delivered O2%) is within 3% of each setting within one minute of selecting each setting.
► Key Feature
| Measurement Range: | 0 to 100 Vol.% |
| Expected Operating Life: | ~ 1,000,000 Vol.% h |
| Electrical Connector: | 3-pin Molex gold plated |
| Initial Output Signal: | 13.0 to 16.5 mV @ dry ambient air |
| Response Time t90: | < 12 s |
| Operating Temperature: | 10 to 40 °C |
| Pressure Range: | 700 to 1250 hPa |
| Linearity Error: | ≤ 3 % @ 100 % O2,applied for 5 min |
| Zero Offset Voltage: | ≤ 200 μV in 100% N2, applied for 5 min |
| Repeatability: | ± 1 % Vol. O2 @ 100 % O2, applied for 5 min |
| Influence of Humidity: | - 0.03 % rel. O2 reading per % RH |
| Recommended Load Resistor: | ≥ 10 kOhm |
Thank you for your time! If you are interested in Philipilip Suresigns VM4 VM6 VM8 patient monitor Recorder Assembly Printer Module 453564015961, please let us know. Welcome to place your orders.Thank you for your time and interest.
Contact Person: Rita
Tel: 8618279091952